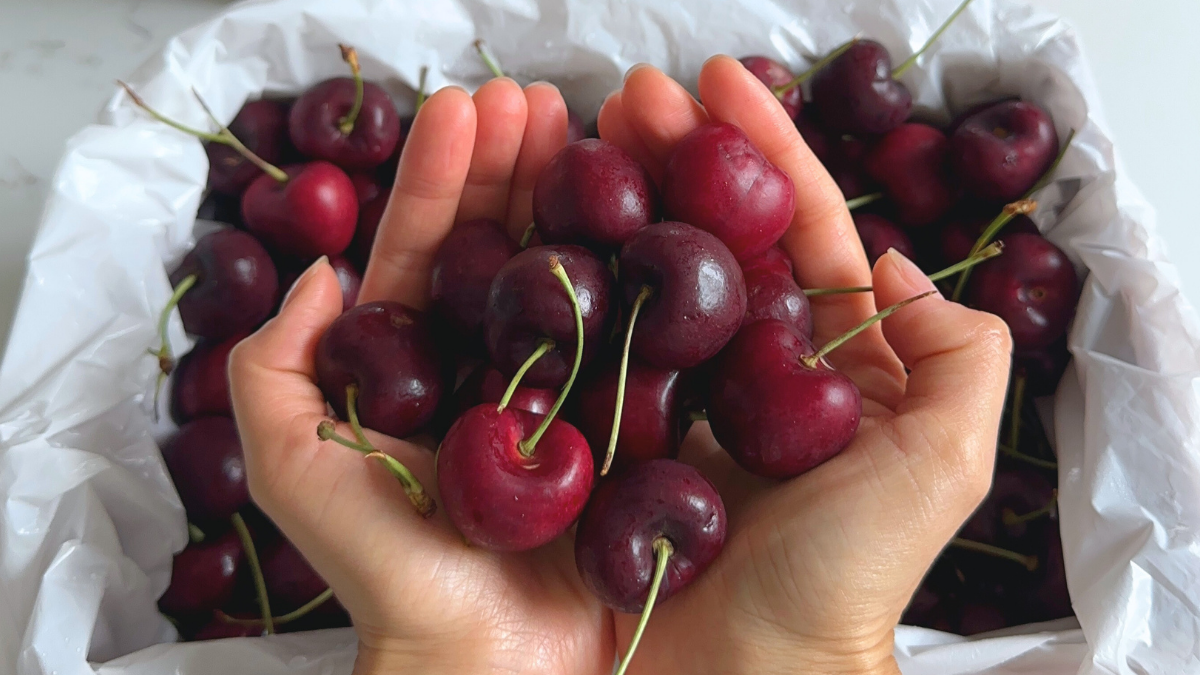
One of my favourite things about summer in Australia is CHERRY SEASON. 🍒 I usually treat myself to a good 2kg box around this time of the year and snack on them fresh almost every day.
Another favourite thing of mine is Black Forest Cake, but making the real traditional version involves actual baking, Kirsch (a type of brandy made from cherries), and mascarpone. So, I wanted to make an easy alcohol-free version using ingredients you might already have at home.
Nothing beats the real deal for most, but I love my No-Bake Black Forest Cake because…
There’s no baking involved. This is great when you want a summer dessert at home without turning on the oven. Just throw it into the fridge to set for a few hours.
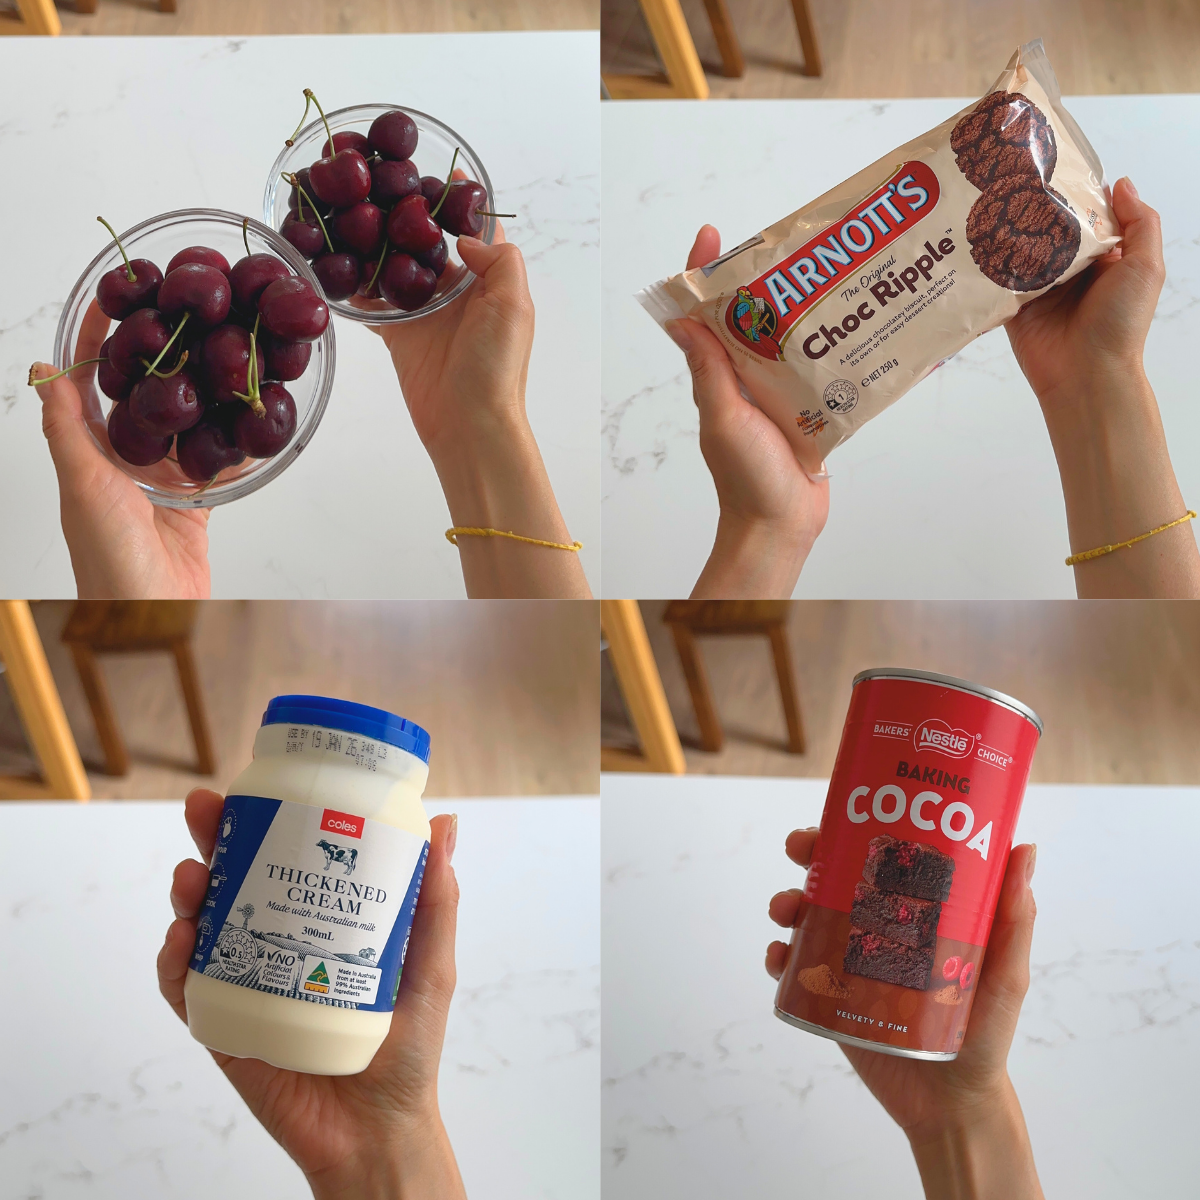
You only need 4 ingredients. No need to buy a ton of ingredients, use them once, and then forget about them.
It’s alcohol-free. I don’t drink by choice. This dessert tastes just as rich and luxurious without the booze.
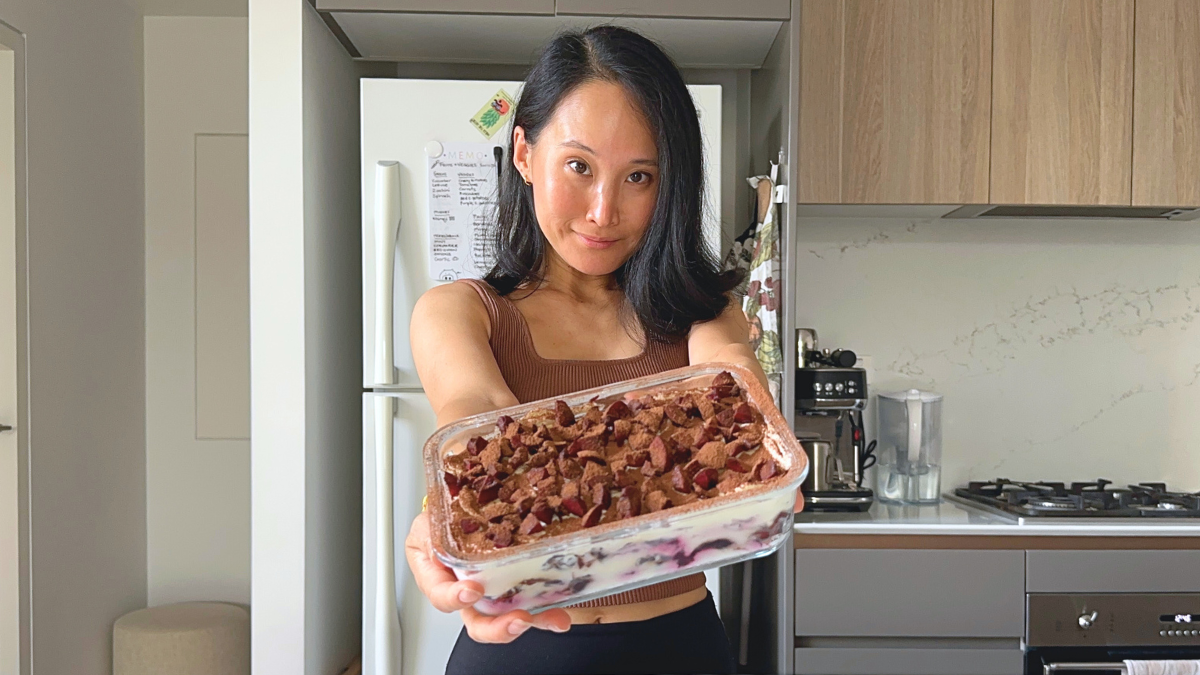
It’s easy to store and serve. I made my No-Bake Black Forest Cake in a 1-litre IKEA glass container with an airtight lid. I guess it’s just like an icebox cake.
Here’s a video of the recipe or scroll down for the details.
Recipe: No-Bake Black Forest Cake with 4 Ingredients
Servings: 4 very polite portions; 2 generous portions; and possible for one person to eat it all if they’ve had a tough day and need a treat.
Prep time: The cake needs to set in the fridge for at least 6 hours, so it’s best to make it the day before serving.
- 5 minutes for de-pipping cherries;
- 15 minutes to make cherry sauce (cool in fridge for at least 20 mins);
- 20 minutes to assemble cake; and
- 6 hours minimum for cake to set in the fridge.
Ingredients
2 x generous cups of cherries, separated (fresh or frozen)
1 x 250g packet of Arnott’s Choc Ripple biscuits
300mL heavy/thickened cream
Cocoa or cacao powder for dusting
Container: I used a glass container that was approximately 20cm x 15cm and 7cm deep. You can also use a bowl – it’ll just have a different shape.
Instructions
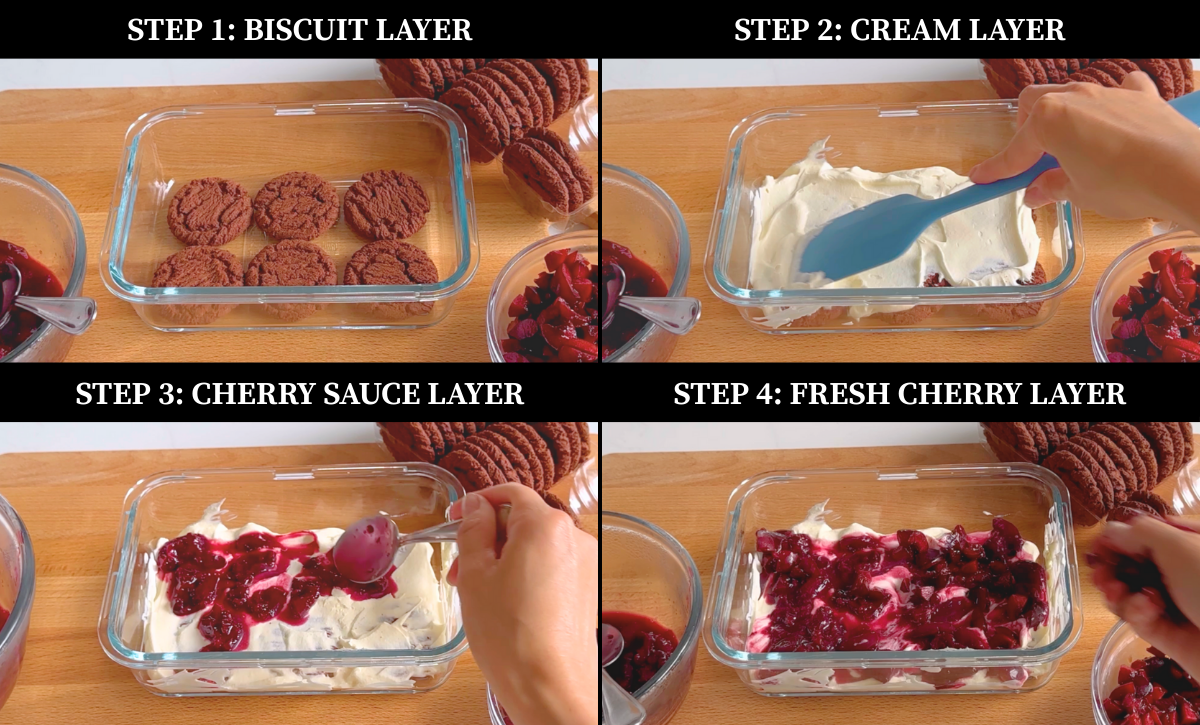
Step 1: Wash & cut cherries and remove cherry pits . Rinse your cherries and if you have a cherry pitter, remove the cherry seeds, before separating them back into the 2 generous cups.
*If you don’t have a cherry pitter, you can either remove them by hand (which can take a while). For 1 cup of cherries going into the sauce, you can cut crosses into the top and bottom of each cherry – once they soften in the sauce, you can scoop out the pits. Just make sure there are no cherry pits before you assemble the cake!
Step 2: Make the cherry sauce. Add 1 cup of the cherries to a saucepan and cook on low heat until soft. Add 1 tablespoon of water and continue cooking until the cherry flesh is soft and you have a syrupy consistency. Transfer to a bowl, cover and cool. You can also pop into the fridge to cool it down faster.
Step 3: Chop up fresh cup of cherries. For your remaining cup of cherries (with no pits), chop them up into little pieces, and leave in fridge. You’ll use these as a layer in the cake.
Step 4: Once the cherry sauce has cooled down, whip cream. Place your thick/heavy cream into a large bowl whip until you see stiff soft peaks. You can use an electric beater or whisk by hand, which just requires a bit more time and arm work!
Step 5: Assemble the cake. This is the fun part! Start by layering the Choc Ripple biscuits at the bottom, then cover the biscuits with some whipped cream. Add the cherry sauce and sprinkle some fresh cherry pieces all over. Repeat the sequence again.
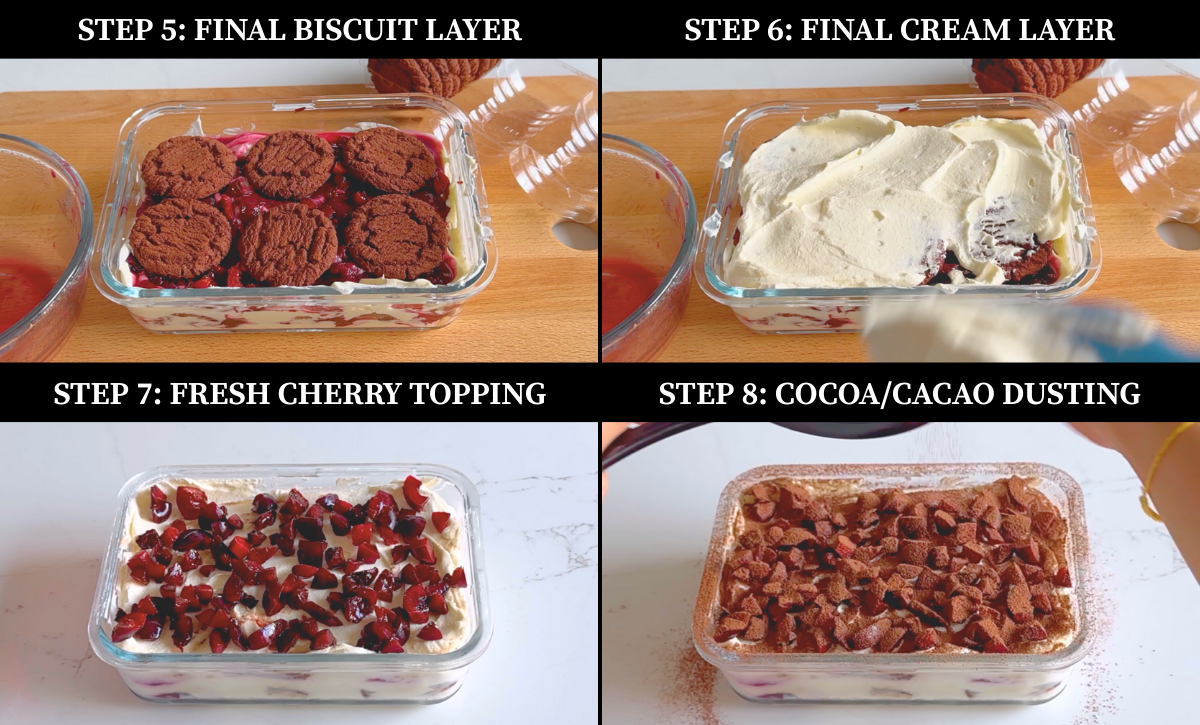
Step 6: Add final biscuit and cream layer, then chill. Your cake should be almost filled to the top of the container. Add the last layer of biscuits and cream. Cover tightly and leave in fridge for at least 6 hours.
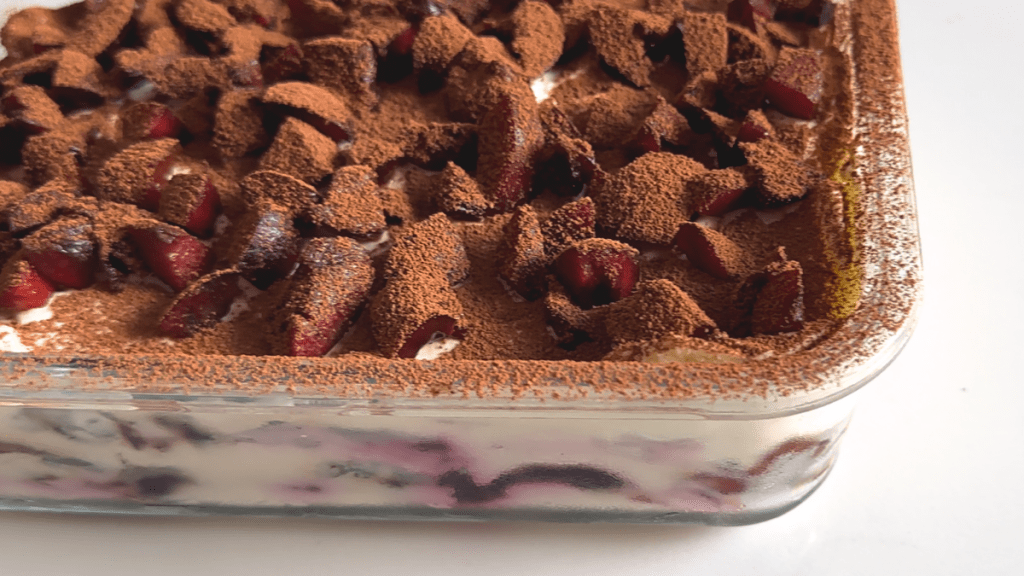
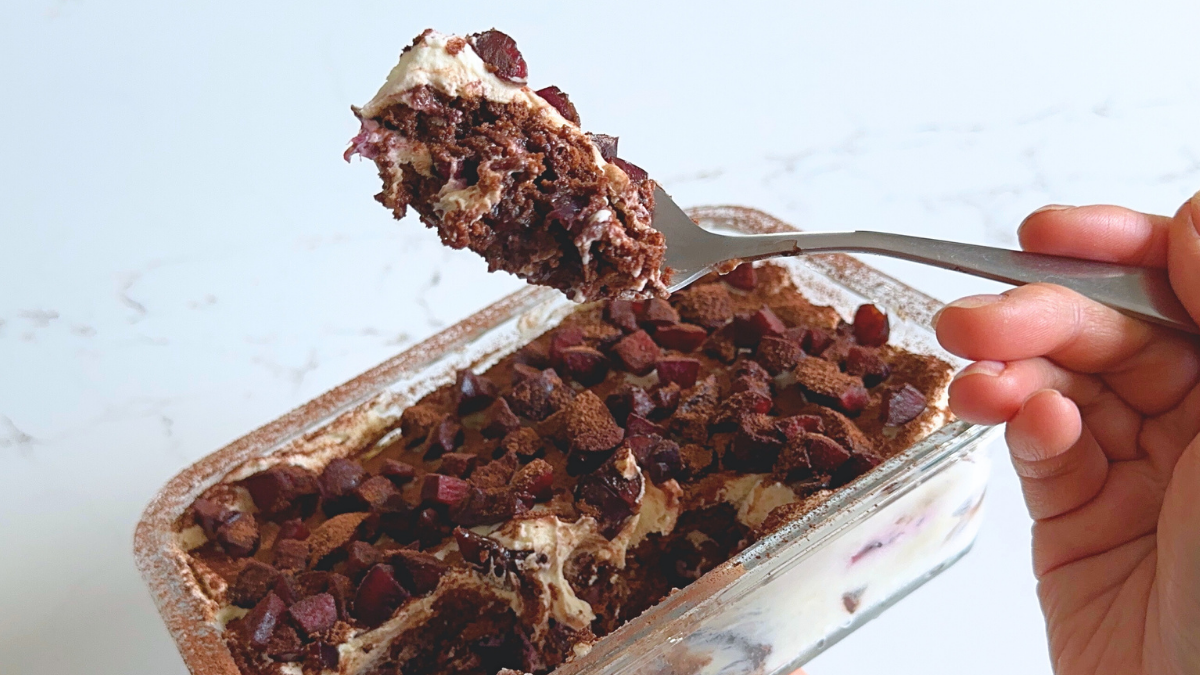
Step 7: Toppings before serving. Take your cake out of the fridge, and test if it’s ready by sticking a small knife toothpick into the cake. If it’s nice and soft, it’s ready! Scatter a layer of fresh cherry pieces over the top and dust with cocoa or cacao powder.
Serve and enjoy.
Being a dessert with fresh cream, I would only keep this for a maximum of 3 days to enjoy it at its best. But honestly, I guarantee that it tastes so good that it won’t last for long.
P.S. I know it’s the New Year, but that doesn’t mean you can’t treat yourself – it’s all in moderation and you know what’s best for your body. That’s why I’m still sharing recipes for desserts and treats. 🫶
I’ll be sharing some ideas for salads and easy homemade dinners that are healthy-ish and realistic for busy weekdays. But, there are also more dessert and snack recipes to come!
